How to Extract Full-Resolution Frames and Screenshots from Video in the Browser
Learn how to extract crisp still frames from MP4, WebM, and MOV videos at native resolution using in-browser canvas decoding without uploading video files.

Capturing a high-quality still frame from a video seems like something an operating system screenshot should easily handle. You pause the clip at the exact moment you want, press Print Screen or Cmd + Shift + 4, and paste the result into an image editor. Yet the moment you zoom in, the flaws become obvious: the image is noticeably softer than the original recording, a semi-transparent pause symbol or progress bar obscures the subject, and black letterbox bars flank the edges.
When you capture your computer screen, your operating system rasterizes whatever pixels are currently being displayed within your video player window. If a 4K video (3840 × 2160 pixels) is displayed inside a browser window shrunk down to 960 × 540 pixels, a standard OS screenshot captures only those 960 × 540 pixels—discarding over 93% of the visual detail present in the original video stream.
To extract a true, full-resolution still from a video clip, you need a dedicated video frame extractor. Instead of snapping the screen, a frame extractor taps directly into the browser’s decoded video buffer, rendering the frame onto an offscreen HTML5 canvas at the video’s native pixel dimensions. With the free, browser-based CoditTools Video Screenshot Tool, you can scrub to any exact second, extract uncompressed frames in lossless PNG format, and download them instantly—all without uploading your video to an external server.

What Is Video Frame Extraction?
At its core, any digital video file is a sequence of individual still photographs—known as frames—played back in rapid succession to create the illusion of smooth motion through the persistence of human vision. Most modern video content is recorded and played back at standard frame rates such as 24 frames per second (fps) for cinematic films, 30 fps for broadcast television and standard web streams, or 60 fps for gaming and high-framerate action.
If you have a 60-second video recorded at 30 fps, that single file contains approximately 1,800 individual pictures. Video frame extraction is the technical process of isolating one specific frame from that compressed temporal sequence, decoding its pixel data, and saving it as an independent raster image file such as a PNG or JPEG.
Decoded Frame vs. Screen Grab
There is a fundamental architectural distinction between grabbing what appears on your monitor and extracting an underlying video frame:
- Screen Capture (OS Level): Your operating system queries the desktop compositor for the current display coordinates. The result is constrained by your monitor’s physical display resolution, system DPI scaling (such as 125% or 150% Windows display scaling), the dimensions of the browser window, and any on-screen controls (playback sliders, volume sliders, timecode overlays, cursor icons).
- Decoded Frame Extraction (Buffer Level): The video rendering engine (such as Chromium’s Blink or WebKit) decodes the compressed video bitstream and reconstructs the full-size pixel matrix in an internal memory buffer. When you extract the frame, code copies this pristine buffer directly to an image encoder at 100% scale (e.g., 1920 × 1080 or 3840 × 2160), completely bypassing the display window and user interface.
How Video Compression Affects Frame Extraction: I-Frames vs. P-Frames
Modern video compression standards (including H.264 / AVC, H.265 / HEVC, VP9, and AV1) do not store every frame as a complete, independent photograph. Storing 30 uncompressed 4K images every second would consume hundreds of megabytes per second, resulting in massive, unplayable files. Instead, video codecs utilize temporal inter-frame compression grouped into what is known as a GOP (Group of Pictures).
Within a GOP, codecs classify frames into three primary categories:
- I-Frames (Intra-coded Frames / Keyframes): These are completely self-contained images encoded much like a standalone JPEG photo. They require no data from prior or subsequent frames to display. Every video file starts with an I-frame, and keyframes are inserted at periodic intervals (typically every 1 to 5 seconds, or whenever a camera cut occurs).
- P-Frames (Predicted Frames): P-frames store only the mathematical differences (motion vectors and residual pixel data) that have changed relative to the previous frame. If a person is talking in front of a stationary wall, the P-frame keeps the wall untouched and records only the movement of the speaker’s lips and eyes.
- B-Frames (Bi-directional Predictive Frames): These frames achieve the highest compression efficiency by referencing pixel data from both preceding and future I-frames or P-frames.
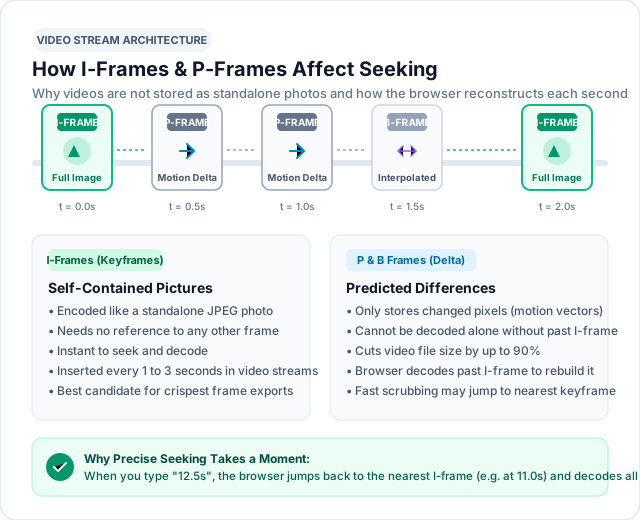
Understanding this architecture explains why seeking through a video sometimes produces a slight micro-delay: to decode a frame sitting at second 14.32, the browser decoder must jump back to the nearest preceding keyframe (say, at second 12.00) and rapidly decode all intermediate delta frames up to 14.32 before presenting the crisp, reconstructed frame.
How to Extract a Frame from a Video Using CoditTools
Extracting a crystal-clear frame from a video does not require launching professional non-linear video editing software like Adobe Premiere Pro or DaVinci Resolve, nor does it require running command-line FFmpeg scripts. The CoditTools Video Screenshot Tool provides a lightweight, browser-native interface designed for immediate frame capture.
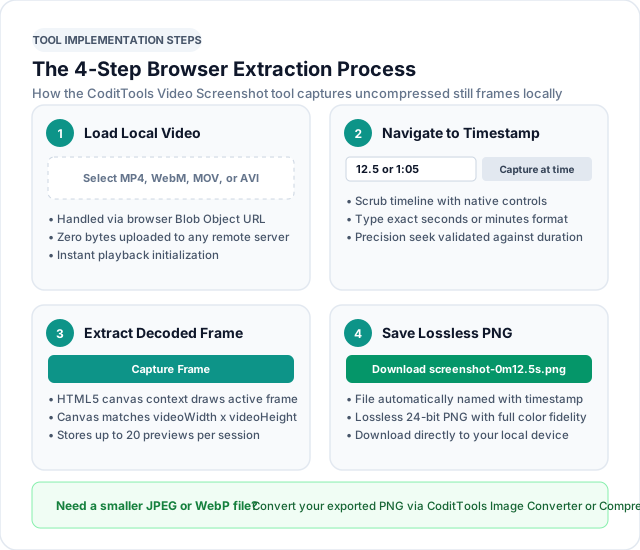
Step 1: Open the Tool and Select Your Video File
Navigate to the Video Screenshot Tool on CoditTools. In the upload area, click Choose Video File or drag and drop your media file directly into the designated dropzone. The tool supports standard browser-compatible video formats, including MP4, WebM, and MOV (encoded with H.264 or VP8/VP9).
Because the tool uses the browser’s native URL.createObjectURL API, the video is loaded instantly into your browser memory. There is zero upload waiting time, regardless of whether your video file is 5 MB or 500 MB.
Step 2: Navigate and Seek to Your Target Timestamp
Once the video is loaded, the player interface displays the video preview along with interactive seeking controls. You have two complementary methods for finding the exact frame you need:
- Scrubbing Slider: Drag the timeline slider back and forth for rapid visual browsing across the duration of the clip.
- Timestamp Input Box: If you know the exact timecode of the moment you wish to save, enter it directly into the timestamp box. The tool accepts both numeric seconds (such as
14.5) and clock-style timecodes (such as1:05or00:01:23). Press Enter or click Seek, and the video immediately decodes to that precise millisecond.
Step 3: Capture the Current Video Frame
When the video player is paused at your chosen moment, click the Capture Frame button. Behind the scenes, CoditTools creates an invisible HTML5 <canvas> element, assigns its width and height to match the video’s internal videoWidth and videoHeight attributes, and executes a hardware-accelerated drawImage() call. The resulting full-resolution frame is rendered into the session gallery below the player.
Step 4: Preview and Download Your Full-Resolution PNG
Each captured frame appears in the Captured Screenshots gallery alongside a timestamp badge (e.g., 0m14.5s). Hover over or inspect the thumbnail to verify that you have captured the exact action without motion blur. Click Download PNG to save the still to your computer. The file downloads with an automatic descriptive name like screenshot-0m14.5s.png.
The session gallery retains up to 20 captured screenshots simultaneously, allowing you to extract multiple stills throughout a presentation or tutorial before downloading the best shots.
Does Extracting a Frame Preserve the Original Video Resolution?
One of the most frequent points of confusion in digital imaging is the difference between display resolution, pixel dimensions, and perceived sharpness. When users ask whether extracting a frame preserves the “original resolution,” they typically want reassurance that the output image is not downscaled.
The short answer is yes: CoditTools extracts frames at 100% of the video’s native pixel dimensions. However, understanding how those dimensions interact with display scaling prevents common misconceptions.
| Video Format / Standard | Source Video Dimensions | Typical Browser Display Width | CoditTools Exported PNG Dimensions | Total Exported Pixels |
|---|---|---|---|---|
| 720p HD | 1280 × 720 px | 640 × 360 px | 1280 × 720 px | 0.92 Megapixels |
| 1080p Full HD | 1920 × 1080 px | 800 × 450 px | 1920 × 1080 px | 2.07 Megapixels |
| 1440p Quad HD (2K) | 2560 × 1440 px | 900 × 506 px | 2560 × 1440 px | 3.69 Megapixels |
| 4K Ultra HD (UHD) | 3840 × 2160 px | 960 × 540 px | 3840 × 2160 px | 8.29 Megapixels |
| Vertical Reel / TikTok | 1080 × 1920 px | 360 × 640 px | 1080 × 1920 px | 2.07 Megapixels |
Pixel Dimensions vs. Perceived Sharpness
It is vital to distinguish between an image’s mathematical pixel resolution and its visual sharpness. Just because an extracted frame contains 3840 × 2160 pixels does not automatically guarantee that every object in the frame is tack-sharp. Several physical factors govern the final optical clarity of an extracted frame:
- Motion Blur (Shutter Speed): Unlike high-speed still photography where shutter speeds of 1/1000s freeze fast motion, video cameras generally follow the 180-degree shutter rule (shutter speed equal to twice the framerate). At 24 fps or 30 fps, the camera shutter stays open for 1/48s or 1/60s. Any rapid movement across the sensor produces natural motion blur that looks smooth during continuous playback, but appears soft when frozen as an individual still.
- Video Bitrate and Macroblocking: High-resolution video files are often heavily compressed by streaming platforms or smartphones to save bandwidth. During fast motion or scene transitions, codecs may discard fine high-frequency details, resulting in blocky artifacts (macroblocking) that become evident when examined as a single photograph.
- Depth of Field and Focus: If the camera lens was focused on a subject in the foreground, background elements will be optically out of focus regardless of the video’s resolution.
In summary: extracting a frame guarantees that you retain every bit of pixel information that exists inside the decoded video stream, but it cannot invent clarity that was never captured by the camera sensor.
PNG vs. JPEG: Which Format Should You Choose?
When saving still images extracted from video, two formats dominate digital workflows: PNG (Portable Network Graphics) and JPEG (Joint Photographic Experts Group). Each format serves distinct technical requirements.

Why CoditTools Uses PNG as the Native Export Format
The CoditTools Video Screenshot Tool intentionally exports captured frames in lossless PNG format. Because the source video has already undergone heavy lossy compression (such as H.264 or VP9 encoding), extracting the decoded frame into another lossy format like JPEG would trigger generation loss—applying a second round of discrete cosine transform (DCT) quantization on top of the video’s existing compression artifacts.
By using PNG, the decoded pixel matrix is preserved verbatim with zero additional compression loss. This makes PNG the ideal master file for archival, graphic design overlays, video thumbnail composition, and scientific or legal inspection.
Format Feature Comparison
| Feature | PNG Format | JPEG / JPG Format |
|---|---|---|
| Compression Type | Lossless (DEFLATE algorithm) | Lossy (Discrete Cosine Transform) |
| Generation Loss | None (pixel-perfect output) | Slight re-compression artifacts |
| Typical 1080p File Size | 1.5 MB – 4.0 MB | 200 KB – 600 KB |
| Alpha Transparency | Supported (8-bit alpha channel) | Not supported (solid background only) |
| Best Use Case | Master archive, editing, graphics, OCR | Web publishing, email attachments, storage |
Converting Downstream to JPEG or WebP
While lossless PNG is optimal for fidelity, PNG files can be relatively large (often 2 MB to 8 MB for 1080p and 4K frames). If you need to embed the extracted still on a website, upload it to an online portal with strict file size limits, or email it to a colleague, you can easily convert the downloaded PNG file downstream:
- To convert your PNG still to a lightweight JPG file, use the CoditTools PNG to JPG Converter or the comprehensive Bulk Image Converter. For an in-depth walkthrough on image formats and trade-offs, read our guide on Free Online Image Converters.
- To reduce file size while keeping high visual fidelity, pass the file through the CoditTools Image Compressor. Learn more about optimal compression thresholds in our tutorial on How to Compress Images Online.
Is Browser-Based Video Frame Extraction Private?
When working with sensitive video recordings—such as internal corporate webinars, confidential software demonstrations, security camera footage, medical records, or personal family clips—privacy is a paramount concern. Many traditional online video converters require you to upload your entire media file to a third-party cloud server where it is queued, decoded, and stored on remote disks.
CoditTools operates on a completely different, privacy-first technical architecture:
100% Local Client-Side Execution
The Video Screenshot Tool runs entirely inside your local web browser engine. When you select a video file, JavaScript calls URL.createObjectURL(file) to generate a local reference pointer pointing to the file already sitting in your device’s RAM or temporary storage. The browser’s internal media framework reads and decodes the video directly using your computer’s CPU and GPU.
Zero Server Uploads and Zero Data Retention
At no point during the upload, playback, seeking, frame extraction, or download process is any video byte transmitted across the internet to CoditTools servers. You can easily verify this client-side privacy architecture yourself:
- Open the Video Screenshot Tool in your browser.
- Disconnect your computer from Wi-Fi or enable Airplane Mode.
- Load a video, scrub through the timeline, capture several frames, and download the resulting PNG files.
The entire workflow operates without any internet connection. Furthermore, when you close or refresh your browser tab, the temporary object URLs and in-memory canvas buffers are instantly purged by the browser’s garbage collection routines, leaving zero trace on external servers.
Common Problems and How to Fix Them
While extracting frames in modern browsers is straightforward, you may occasionally encounter specific challenges related to video encoding, system hardware, or camera settings. Here is how to diagnose and resolve common issues:
1. Extracted Frame Appears Blurry or Smudged
Cause: Camera motion blur or aggressive video compression. If the camera was panning quickly or the subject was moving rapidly during recording, individual frames contain optical motion blur.
Fix: Use the timestamp input box to nudge playback forward or backward by small fractions of a second (e.g., from 12.4 to 12.2). Look for moments where the camera paused or subject movement momentarily ceased. If the softness is caused by heavy compression macroblocking from an online platform, locate the original uncompressed source file rather than downloading from social media.
2. The Video Player Will Not Load or Shows a Black Screen
Cause: Unsupported video container or proprietary video codec. While standard MP4 files using the H.264 video codec work across all browsers, containers like MKV, AVI, or FLV are not supported natively by web browsers. Similarly, high-end production codecs like Apple ProRes or Avid DNxHD cannot be decoded by standard browser media engines.
Fix: Ensure your video container is MP4, WebM, or MOV. For maximum cross-browser compatibility, re-encode your video using standard H.264 (AVC) video with AAC audio.
3. Browser Stutters or Crashes with High-Resolution (4K/60fps) Video
Cause: High browser memory (RAM) consumption. Decoding 4K 60fps video in a web browser requires significant graphics acceleration and RAM. On laptops with 8 GB of RAM or limited integrated graphics, seeking through an uncompressed 2 GB video file can cause browser tab throttling.
Fix: Close unnecessary browser tabs and background applications before loading large 4K files. If the video is excessively long (e.g., a two-hour recording), consider trimming the video to a shorter 1-minute clip around your target timestamp before loading it into the browser tool.
4. Difficult to Land on the Exact Millisecond
Cause: Keyframe-based timeline snapping. Standard scrubbing sliders may occasionally snap to the nearest I-frame (keyframe) because decoding isolated predictive frames during rapid mouse movement can be computationally heavy.
Fix: Instead of relying solely on the dragging slider, type fractional seconds directly into the timestamp box (such as 04.25, 04.50, or 04.75) and click Seek. This forces the browser decoder to accurately compute all delta frames up to that specific fraction of a second.
5. Black Image When Attempting to Capture Protected Streaming Content
Cause: Digital Rights Management (DRM) hardware protection. Commercial streaming services (such as Netflix, Disney+, Amazon Prime Video, or Hulu) utilize Encrypted Media Extensions (EME) backed by Widevine or FairPlay DRM. These systems instruct your computer’s GPU to render the protected video stream into an encrypted hardware overlay surface.
Fix: HTML5 canvas elements are intentionally prohibited by security standards from reading data out of DRM-protected video buffers (a security policy known as “tainted canvas”). Frame extraction tools can only process unprotected video files (such as personal recordings, camera footage, open-source video, or royalty-free media) stored directly on your device.
Frequently Asked Questions
Can I extract a frame from a 4K video?
Yes. The CoditTools Video Screenshot Tool extracts frames based on the video’s underlying videoWidth and videoHeight properties. If your source file is 4K Ultra HD (3840 × 2160 pixels), the extracted PNG will be exported at full 3840 × 2160 pixel resolution, regardless of whether your computer monitor is a 1080p screen or a smaller laptop display.
How can I save a video frame without adding quality loss?
To avoid adding quality loss, export the frame in a lossless raster format like PNG rather than JPEG. The CoditTools tool exports directly to PNG using lossless compression, ensuring that no additional compression artifacts, color banding, or quantization errors are introduced during the extraction process.
Why does a screenshot of a paused video look blurry?
Standard operating system screenshots capture the video at the size it is being displayed inside your software window, rather than its true recorded resolution. In addition, video paused during fast action naturally displays optical motion blur from the camera’s shutter angle, and screen grabs often inadvertently capture player overlay elements and compression artifacts from your monitor’s display scaling.
Does extracting a frame upload my video to a server?
No. CoditTools processes videos entirely client-side using native HTML5 and JavaScript APIs. The video file is accessed locally via your browser’s memory, and no video data, frames, or personal information are ever uploaded to an external server or stored in a remote database.
Can I extract frames from MP4 and WebM videos?
Yes. MP4 (with H.264 encoding) and WebM (with VP8 or VP9 encoding) are both natively supported by modern web browsers including Google Chrome, Mozilla Firefox, Apple Safari, and Microsoft Edge. You can drag and drop either format directly into the tool for instant frame extraction.
What is the difference between an I-frame and a P-frame?
An I-frame (Intra-coded frame or keyframe) is a complete, self-contained picture stored within the video file. A P-frame (Predicted frame) stores only the motion differences and changes relative to preceding frames. When extracting a frame, the decoder automatically references the nearest keyframe to reconstruct the complete image.
Conclusion
Extracting high-resolution still photographs from video files is an essential technique for content creators, educators, video editors, and digital marketers. Relying on operating system screen grabs introduces avoidable compromises: scaled-down resolutions, UI interface clutter, and muddy compression artifacts.
By leveraging browser-based frame extraction, you tap directly into the native video stream, extracting pristine frames at their true recorded pixel dimensions. With the CoditTools Video Screenshot Tool, the entire process takes seconds: load your MP4 or WebM video locally, scrub or enter your target timestamp, and download full-resolution PNG stills with complete privacy and zero upload wait times. When you need to optimize those images for web publishing or email distribution, pair your workflow with the CoditTools Image Compressor and PNG to JPG Converter for an end-to-end media production toolkit.
Try the tools mentioned in this post - all free, no account needed.
Runs in your browser. No watermarks. No file uploads to a server.
Browse all tools →