Remove Image Background Online: When Colour-Based Removal Works
How the CoditTools background remover decides what to delete, what it does to test images with labels and shadows, and how to shoot photos that cut out cleanly.
The CoditTools Background Remover does not detect the subject of a photo. It looks at the colour in the four corners of the image and makes every pixel of a similar colour transparent, wherever that pixel is. That makes it quick and reliable on a plain, evenly lit backdrop, and it explains exactly where it fails: a subject that shares a colour with the background, a shadow, a gradient, or a busy scene.
Knowing the rule lets you predict the result before you upload anything, and decide when a different kind of tool (one based on subject detection) is the right choice. This page explains the rule, shows what it does to three test images, and gives you a way to take photos that remove cleanly.
How the tool decides what to remove
- It averages a small square (18 × 18 pixels) in each of the four corners, then averages those four colours into one "background colour".
- For every pixel in the image it measures how far its red, green and blue values are from that colour.
- If the distance is within the background sensitivity (default 48 on a 10–120 slider), the pixel becomes fully transparent.
- If it is a little further, within the edge softness (default 34 on a 5–80 slider) beyond that, the pixel becomes partly transparent, more opaque the further away it is. This softens the cut edge instead of leaving a hard line.
- Everything else is kept unchanged, and the result is saved as a PNG, which supports transparency.
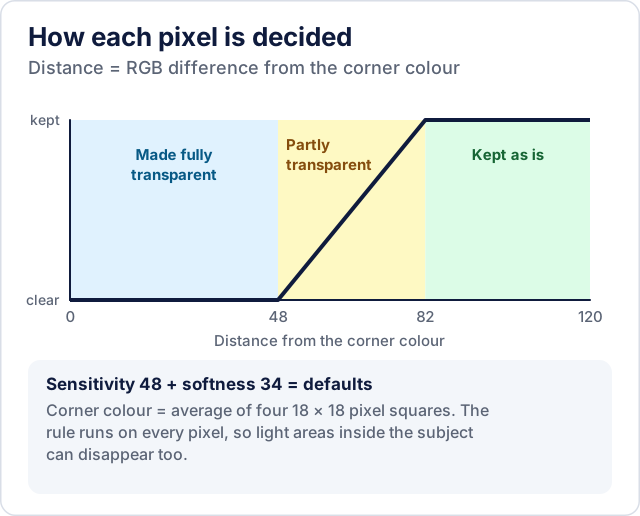
Two consequences follow, and they cover nearly every disappointing result. The rule is applied to the whole image, not just to the area connected to the edge, so a pixel inside the subject that happens to match the background colour disappears too. And it measures colour only: it doesn't know what is a person, a bottle or a shadow.
What it does to three test images
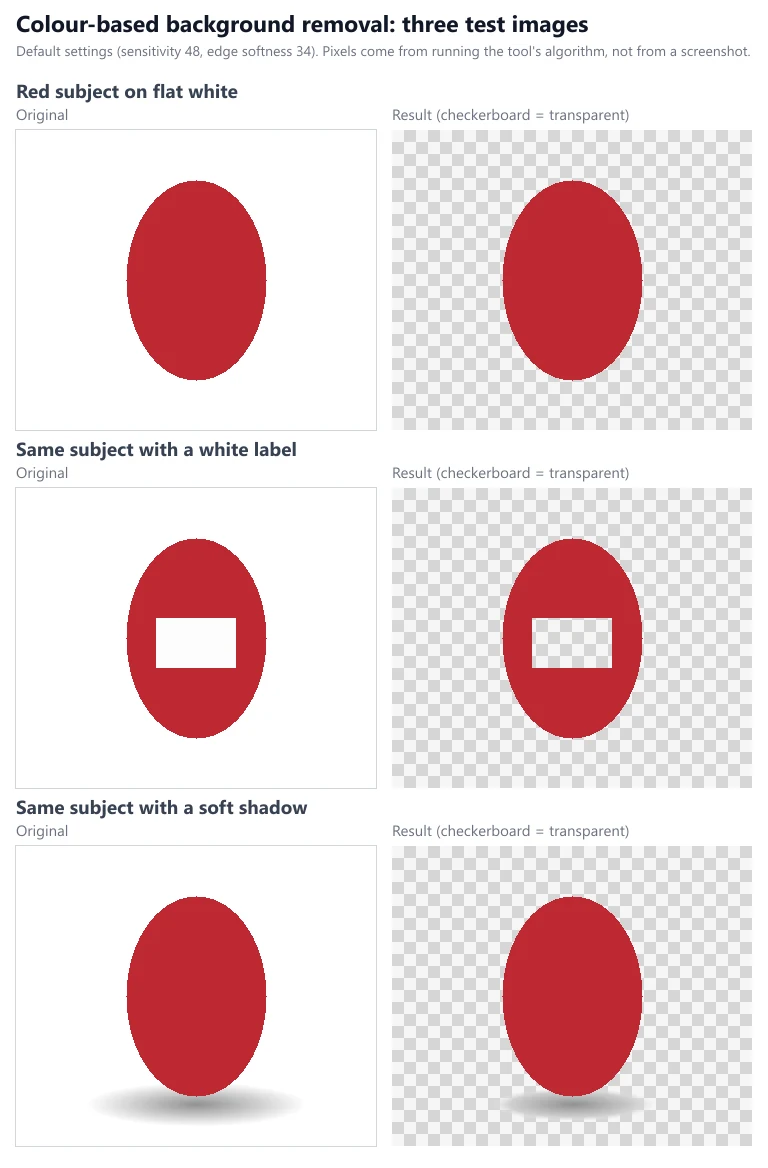
The figure shows the tool's own rule (same corner sampling, distance test and default settings) applied to three simple synthetic images, with the percentages measured on those images:
| Test image | Result at the default settings |
|---|---|
| Red subject on flat white | Clean cut: no part of the subject removed and no background left |
| Same subject with a white label printed on it | The background is removed, but so is the label: 18% of the subject's pixels became transparent, leaving a hole the shape of the label |
| Same subject with a soft grey shadow on the floor | The subject is intact, but about 2,300 shadow pixels stay fully opaque and about 1,600 more stay partly see-through, so a grey smudge remains under it |
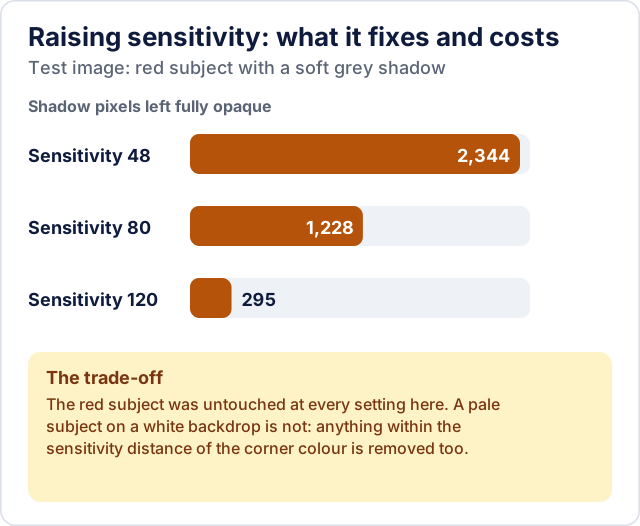
On the shadow image, raising the sensitivity removes more of the smudge, and it didn't touch the subject here because red is far from white: at sensitivity 80 about 1,200 shadow pixels stayed opaque, and at 120 about 300. The trade-off is real, though. A higher sensitivity also removes any part of the subject whose colour is within that distance of the background, so a pale subject on a white backdrop starts to disappear as the slider goes up.
Which photos remove cleanly, and which don't
| Photo | Expected result | Why |
|---|---|---|
| Product on pure white or a single flat colour, evenly lit | Good | Every background pixel is close to the sampled colour |
| Logo or icon with a flat background | Good | Same reason; edges are sharp, so little softening is needed |
| White product, white background | Poor | The subject is close to the background colour and is removed along with it |
| Subject with white or light details (labels, text, highlights, teeth, eyes) | Holes | The rule has no notion of "inside the subject" |
| Soft shadows, reflections | Smudges | Shadows are a different colour from the backdrop but close to it |
| Gradient or vignetted backdrop | Uneven | The sampled colour is an average of the corners, so it matches the middle of the gradient but not its ends (see below) |
| Corners that differ (for example a subject touching one corner) | Unpredictable | The four corner colours are averaged into a colour that may match none of them |
| Hair, fur, glass, motion blur | Rough edges | Fine detail and semi-transparent edges blend with the background colour |
| Natural scenes, crowds, rooms | Not suitable | There is no single background colour |
The gradient case is easy to underestimate. In a test with a grey backdrop fading from light to slightly darker, the sampled colour was the average of the four corners, 210 on the grey scale, roughly the middle of the gradient. With the default settings every pixel of that backdrop ended up fully or partly transparent, so a faint haze of semi-transparent grey remained rather than a clean cut. Plain backgrounds with a subtle gradient are therefore worth a test run, but strong gradients are not suitable.
Getting a clean result
Before the photo is taken
- Photograph the subject on a backdrop that is clearly different in colour from every part of it. For a white product, use a mid-coloured backdrop and remove that instead.
- Light the backdrop evenly, and move the subject away from it so its shadow falls elsewhere or is soft and faint.
- Keep the four corners of the frame empty and the same colour as the rest of the backdrop.
In the tool
- Open the Background Remover and upload the image (any format your browser can open).
- Press Remove Background with the defaults, and look at the result against a contrasting colour. Check edges, any light areas inside the subject and the area under it.
- If background is left, raise the sensitivity a few steps at a time; if parts of the subject are disappearing, lower it. If the edge looks harsh or has a thin halo, change the edge softness.
- Download the PNG when it is right. If no setting gives a clean cut, the photo is outside what a colour rule can do.
Changing a slider does not update the result by itself; you press Remove Background again each time. The processing happens in your browser, and the image is not uploaded.
Using the transparent PNG afterwards
- A PNG with transparency is large for a photo. If you only need the cut-out on a plain white or coloured background, flatten it by converting to JPG with PNG to JPG; transparent areas are filled with white in the JPG.
- To keep transparency but reduce the file size, use the Image Compressor; for a PNG it recompresses losslessly, and PNG to WebP usually gives a smaller file that still supports transparency.
- Check the cut-out on the colour it will actually sit on. Edges that look fine on white can show a pale rim on a dark background.
When to use a different tool
If the subject has hair or fur, the background is busy, or you need the same quality across hundreds of product photos with shadows, a tool based on subject detection is the better choice. Many of those tools work by sending the image to a server or loading a large model, so check where your photos go before using them for anything private. The CoditTools tool is the better fit when the photo has a plain backdrop, when you don't want to upload images, or when you want predictable behaviour you can fix with two sliders.
Try the tools mentioned in this post - all free, no account needed.
Runs in your browser. No watermarks. No file uploads to a server.
Browse image tools →