How to Convert HEIC to JPG on iPhone, Mac, Windows and in Your Browser
How to convert HEIC to JPG on an iPhone, a Mac, Windows or in your browser, what changes in the JPG, and how to convert many photos at once.
HEIC is the photo format iPhones have saved by default since iOS 11, and plenty of places still can't open it: Windows without extra codecs, many upload forms, some older apps. The fix is a JPG copy of the photo. The quickest way depends on the device you are on and how many photos you have, so this guide goes through each option.
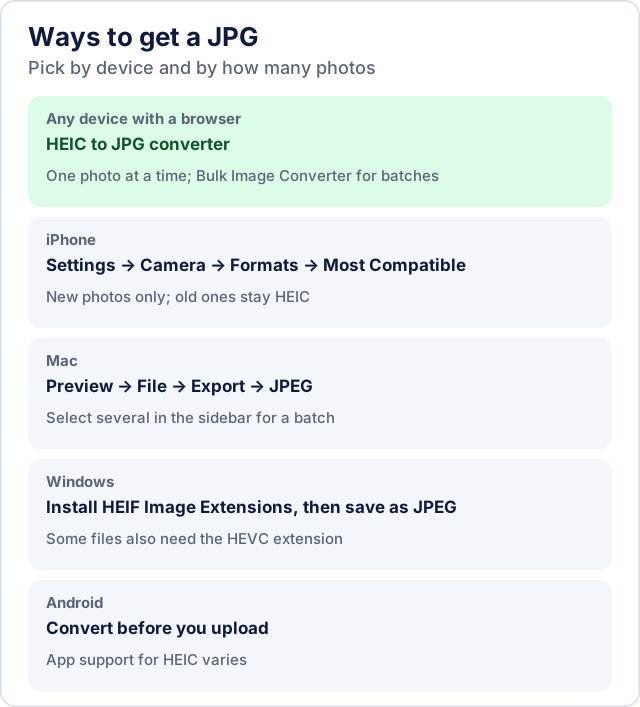
Convert in your browser
- Open the HEIC to JPG converter.
- Click the upload area and choose your .heic photo. Conversion starts as soon as the file is chosen.
- Check the preview, which shows the original and the JPG side by side.
- Click Download JPG. The file is named like IMG_1234_converted_codittools.jpg.
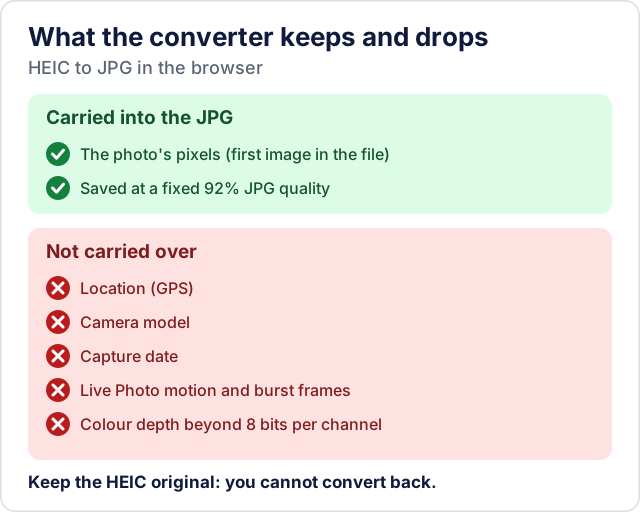
The photo is decoded and re-encoded in your browser, so it is not uploaded. The JPG is saved at a fixed 92% quality; there is no quality setting. Only the first image in the file is converted, so the motion of a Live Photo and the other frames of a burst are left out. Metadata such as location, camera model and capture date is not copied into the JPG.
The page converts one file at a time. For a whole camera roll, the Bulk Image Converter takes a batch of HEIC photos and returns JPGs in one ZIP.
On an iPhone: stop saving HEIC
To get JPG from the start, open Settings, then Camera, then Formats, and choose Most Compatible. New photos are saved as JPG. Photos you already took stay HEIC. The photos are larger, and you give up the space saving that HEIC was designed for.
If you move photos to a Mac or a PC by cable, Settings, then Photos, then Transfer to Mac or PC, has an Automatic option that converts photos to a compatible format during the transfer. Keep Originals leaves them as HEIC.
On a Mac
Open the photo in Preview, choose File, then Export, set the format to JPEG, and save. To convert several at once, select them in Preview's sidebar and choose File, then Export Selected Images.
On Windows
Windows can open HEIC after you install Microsoft's HEIF Image Extensions from the Microsoft Store, and some files also need its HEVC extension. Once a photo opens, an editor such as Paint can save a copy as JPEG. If you would rather not install anything, the browser converter above does the same job.
On Android
Android 9 and later can display HEIC in many apps, but support varies by app, and many sites and forms still reject the file. If something refuses a HEIC photo, convert it before uploading. We tested the converter in a desktop browser for this guide; mobile browsers were not part of that test.
What changes in the JPG
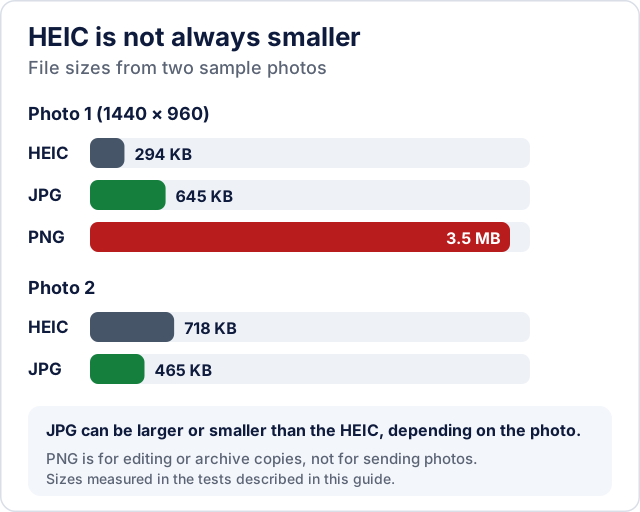
File size. HEIC usually compresses better than JPG, so the JPG is often larger, but it varies. In tests with sample photos, a 294 KB HEIC became a 645 KB JPG at 1440×960, while a 718 KB HEIC became a 465 KB JPG.
Quality. The JPG is a lossy re-encode, not a bit-for-bit copy. For sharing, uploading and printing the difference is rarely visible, but the HEIC original keeps more information. HEIC can store more than 8 bits per color channel; a standard JPG stores 8.
Metadata and extra frames. Location, camera details and Live Photo motion do not carry over, as described above. If you need them later, keep the original.
Common mistakes
Deleting the HEIC originals. You can go from HEIC to JPG but not back. Keep the originals and share the JPG copies.
Expecting location data in the JPG. Photos converted here do not include GPS coordinates. That is useful when you don't want to share where a photo was taken, and a problem if you do.
Choosing PNG for sharing. PNG is lossless but much larger: the 294 KB test photo became a 3.5 MB PNG against 645 KB as a JPG. The HEIC to PNG converter is for editing or archive copies, not for sending photos.
Sending through an app that recompresses images. Many messaging apps apply their own compression to photos you send, so a careful conversion can still lose quality on the way. If the final quality matters, send the file as a document or by another route.
If the JPG is still too big
Run it through the Image Compressor to bring the size down. The image conversion tools also cover the other common pairs, such as WebP to JPG and PNG to JPG.
Try the tools mentioned in this post - all free, no account needed.
Runs in your browser. No watermarks. No file uploads to a server.
Browse image tools →