How to Reduce PDF File Size: What Works, What Doesn't and Why
Why a PDF is large, what the CoditTools compressor can and can't shrink, why some files won't get smaller, and other ways to reduce PDF size.
Almost all of a large PDF's weight is usually images, plus embedded fonts. To reduce a PDF's size meaningfully you have to make those images smaller: lower their quality, their resolution, or both. Tidying the file's internal structure is lossless but usually saves little. The method that works also depends on how the PDF was made: a scan, a document exported with photos, and a text-only report each need a different approach.
This guide explains what takes up the space, what the CoditTools Compress PDF tool can and can't change, and what to do when a PDF refuses to get smaller.
What takes up the space in a PDF
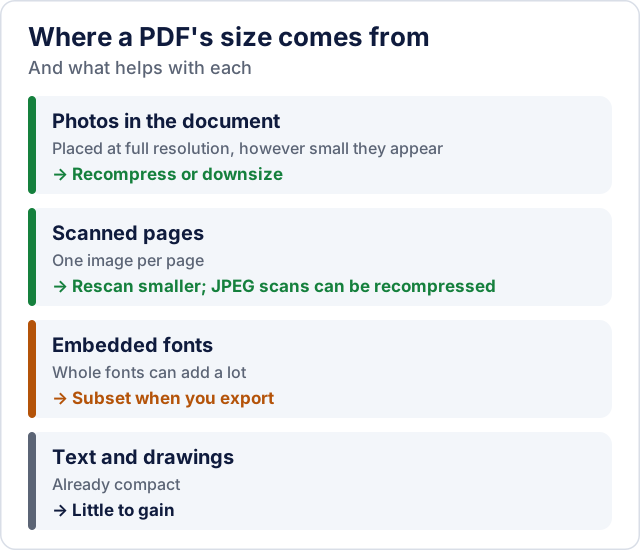
- Photos and other raster images. A photo is stored at whatever resolution and quality it had when it was placed in the document. A 12-megapixel phone photo dropped into a one-page flyer keeps all 12 megapixels, even though the page only shows it a few centimetres wide.
- Scanned pages. A scan is one image per page, so its size depends on the scan resolution, colour mode and how the scanner compressed it. A colour scan at 300 dpi is far larger than a black-and-white one.
- Embedded fonts. PDFs carry their fonts so the document looks the same everywhere. A font embedded in full, rather than as a subset of the characters actually used, can add tens or hundreds of kilobytes, and much more for fonts with large character sets such as Chinese or Japanese; Adobe lists fonts and image resolution as the main causes of oversized PDFs.
- Leftovers. Metadata, duplicated resources and the history of incremental edits can add size, but they are rarely most of it.
Text and vector drawings (charts, diagrams and logos saved as shapes) are compact. A long report made only of text is usually small; add a handful of full-resolution photos and the same report can become many times larger.
Which kind of PDF do you have?
| The PDF is... | Where the size comes from | What reduces it |
|---|---|---|
| A document exported with photos (brochure, report, portfolio) | Photos embedded at full resolution | Recompressing and downsizing the photos; re-exporting from the original with a smaller-size option |
| A scan from a scanner or phone app | One image per page | Depends on how the scan stores its images (see below); rescanning in black and white or at 200–300 dpi often helps most |
| Mostly text, exported from Word or similar | Fonts and structure | Little to gain; use font subsetting when you export |
| Already compressed by someone else | Images that are already small | Very little; compressing again mostly costs quality |
What the CoditTools Compress PDF tool does
The tool runs in your browser with the open-source pdf-lib library, so the PDF is not uploaded. It never turns pages into pictures: text stays selectable and searchable, and vector drawings stay sharp. It offers four settings:
| Setting | What it changes | Lossy? |
|---|---|---|
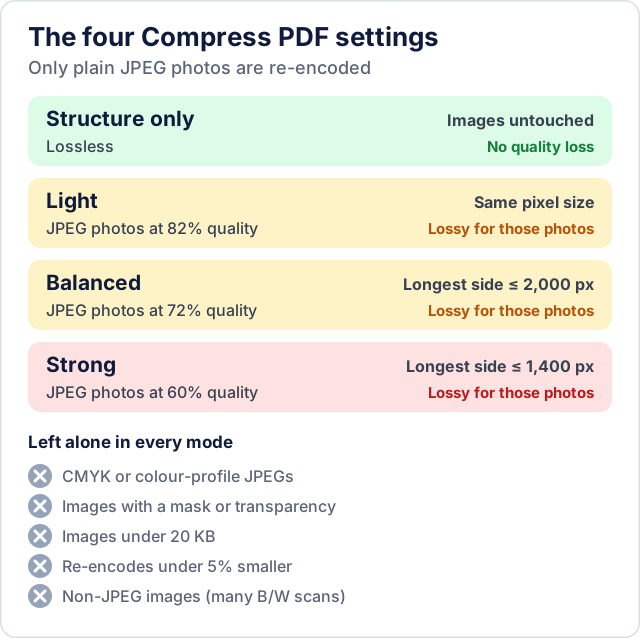
| Structure only (default) | Rewrites the file with compressed object streams and clears the document information fields (title, author, subject, keywords, creator and producer). Images and fonts are untouched. | No |
| Light | Also re-encodes JPEG photos at 82% quality, at their original pixel size | Yes, for those photos |
| Balanced | Re-encodes JPEG photos at 72% quality and scales down any photo larger than 2,000 pixels on its long side | Yes |
| Strong | Re-encodes JPEG photos at 60% quality and scales them to at most 1,400 pixels | Yes |
To avoid damaging your document, the image settings deliberately skip images they can't handle safely, and the result screen tells you how many were skipped and why:
- images that are not standard JPEGs, such as most black-and-white scans (stored as CCITT or JBIG2) and lossless images like screenshots;
- JPEGs in CMYK colour or with an embedded colour profile other than sRGB, which is common in files prepared for professional printing;
- images with transparency or a mask, and JPEGs carrying a rotation tag;
- images under 20 KB, and any image whose re-encoded version would be less than 5% smaller.
Finally, the tool compares sizes. If neither setting produced a smaller file, it keeps your original and says so, instead of handing you a "compressed" file that is the same size or bigger. A recompressed file is also only used if it still opens and has the same number of pages.
One side effect to know about: because every setting clears the document information fields, the optimised file no longer has a title or author in its properties. If those fields matter (for example a title shown in a PDF reader's window bar), set them again in your PDF editor afterwards.
Why a PDF won't get smaller
- It's mostly text. There are no photos to recompress and the structure is often already efficient. "Structure only" may save a few percent or nothing, and the tool will keep your original.
- The scan isn't stored as JPEG. Many black-and-white scans use CCITT or JBIG2 compression, which is already very compact for text pages, and the tool does not re-encode those formats. A colour or greyscale scan stored as JPEG can be recompressed.
- The images are already compressed. If a previous tool or the scanner already saved the images at modest quality, re-encoding them saves less than 5% and they are left as they are.
- The PDF was prepared for print. CMYK images and colour profiles are skipped to avoid colour shifts, so a print-ready brochure may not shrink at all. Ask for, or export, a screen version instead.
- Fonts are a large share. The tool does not subset or remove fonts. Re-exporting from the source with font subsetting turned on is the fix.
- It's password-protected. Encrypted PDFs can't be opened for optimisation; the tool tells you to remove the password first and reapply it afterwards if needed.
Other ways to reduce PDF size when the tool can't
- Re-export from the source file. This is usually the cleanest result because the images are reduced before the PDF is built. In Word for Windows, choose File > Save As, pick PDF, and under "Optimize for" select Minimum size (publishing online), which Microsoft recommends when file size matters more than print quality.
- Resize photos before you insert them. A photo only needs about as many pixels as it will be shown at. The image resizer and image compressor can shrink photos before they go into a document or into Images to PDF.
- Rescan. For text documents, a black-and-white scan at 200–300 dpi is much smaller than a colour scan and stays readable. Use colour only for pages that need it.
- Ghostscript (free, command line) can downsample every image in a file:
gs -sDEVICE=pdfwrite -dPDFSETTINGS=/ebook -dNOPAUSE -dBATCH -sOutputFile=smaller.pdf input.pdf. According to the Ghostscript documentation,/ebooktargets 150 dpi colour and greyscale images and/screen72 dpi. Unlike the CoditTools tool, it rewrites the whole file, so check the output carefully. - Split instead of compress. If a portal has a per-file limit and the document is long, sending it in parts with PDF Splitter keeps the full quality.
Compressing a PDF step by step
- Note the size limit you need to meet (for example an upload form that accepts 5 MB).
- Open Compress PDF and add the file.
- Start with Structure only. If the result is already under your limit, you're done and nothing visible has changed.
- If not, try Balanced. Read the summary: it lists how many photos were recompressed and why others were skipped.
- Open the downloaded file and zoom in on photos and any scanned text before you send it. Use Strong only if Balanced isn't enough and the photos still look acceptable.
- If the summary says most images were skipped, the file needs one of the other methods above rather than a stronger setting.
Try the tools mentioned in this post - all free, no account needed.
Runs in your browser. No watermarks. No file uploads to a server.
Browse PDF tools →